ThemeTastic Theme Documentation
Thank you for purchasing the ThemeTastic - Premium Drupal Theme by Theme Boutique. In order to get the most out of your purchase, please make sure to carefully read all of the information contained in this document. Use the table of contents on the left hand side of the page to jump to a relevant section.
I. Installation
New Installation
New installations come equipped with all of the demo content and can be set up in a matter of minutes. Follow the steps below to get started:
- This theme requires a working Drupal installation to function. Download the latest version of Drupal 7 and go through the installation process. When Drupal is installed, move onto the next step.
- Unzip the contents of ThemeTastic.zip (found in the theme download from ThemeForest). The unpacked zip file contains three folders:
- sites/all/themes -- Contains the ThemeTastic theme files
- sites/all/modules -- Contains the module files required by the ThemeTastic theme
- sites/default -- Contains the demo content images
- Click the Modules link in the Drupal administration toolbar at the top of the page and enable the "Backup and Migrate" module. When your settings are saved, move onto step #4.
- Navigate to Configuration > Backup and Migrate in the Drupal UI. Click the "Restore" tab and upload the ThemeTastic-2013-12-17T00-28-10.mysql.gz file (found in the Assets folder of the ThemeTastic theme download from ThemeForest). When the file has been selected, click the "Restore Now" button.
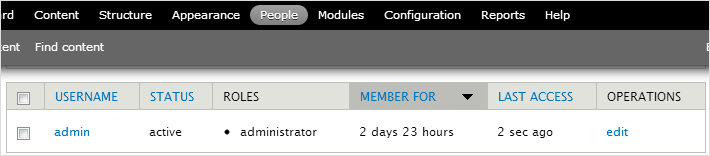
- The last step is to change the administrator username/password back to your own credentials -- the admin username/password was reset when the demo content was uploaded in the previous step. (New Username: admin, New Password: admin). Navigate to the People section in the Drupal UI and click the "edit" link for the admin account to reset your username/password:
- Congratulations! The ThemeTastic theme, along with the demo content, is now installed.
- Optional Subtheme: An optional subtheme, found in the sites/all/themes/themestastic_sub folder, can be installed to make the theme update process easier. This is highly recommended if you plan on seeking support on our forums or frequently updating the theme with the latest version available on ThemeForest. To install the subtheme, follow these steps:
- Rename the themetastic_sub folder to the desired subtheme name (make sure there are no spaces or capital letters).
- On the first line of the themetastic_sub.info file, choose a name for the theme (spaces allowed).
- Rename the themetastic_sub.info file to match the folder name selected in number step #1 of the subtheme installation.
- Navigate to Appearance in the Drupal admin to enable and set the subtheme as the default.
- Inside the /css folder for the subtheme, you will find a file titled custom.css. Here you can add any CSS edits you make to the theme.
Existing Installation
Existing installations do not come with the demo content. To setup ThemeTastic on an existing Drupal site, follow these steps:
- Unzip the contents of ThemeTastic.zip (found in the theme download from ThemeForest). The unpacked zip file contains three folders:
- sites/all/themes -- Contains the ThemeTastic theme files
- sites/all/modules -- Contains the module files required by the ThemeTastic theme
- sites/default -- Contains the demo content images
- Click the Modules link in the Drupal administration toolbar at the top of the page and enable the "ThemeTastic: Features" module.
- Optional: Populate the taxonomy terms used for the blog/portfolio. Terms can be added to the Categories, Tags, and Portfolio vocabul aries found by navigating to Structure > Taxonomy. The portfolio terms are used for the filter on portfolio pages, where as the Categories/Tags vocabulary terms are used with the blog. Adding terms to the "Tags" vocabulary will also populate the Tag Cloud block in the footer.
Multilingual Setup
Sometimes referred to as i10n, Localization allows for localized and/or multilingual Drupal installations. This section of the documentation will outline setting up a multilingual Drupal installation, and provide additional information for extending your multilingual installation as you see fit:
Installing Language Libraries
Before we can begin exploring the multilingual capabilities of our Drupal installation we'll need to install the appropriate language libraries.
- Click the Modules link in the Drupal administration UI and enable the Locale, Content Translation, and Localization Update modules. If all of these modules are enabled, move onto the next step.
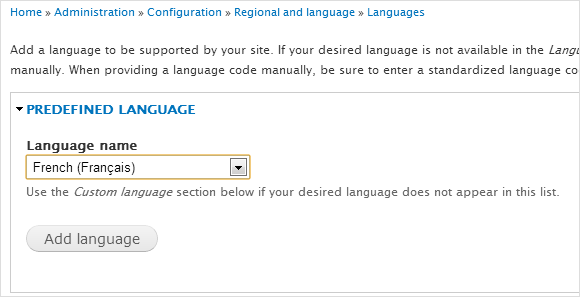
- Navigate to Configuration > Languages > Add Language. Choose a language and click the "Add Language" button:
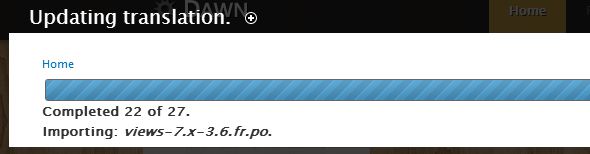
Drupal will now update your installation with all available translations for your setup. This may take a minute or two:
- A detection path for the new language needs to be setup. Click the "Detection and Selection" tab:
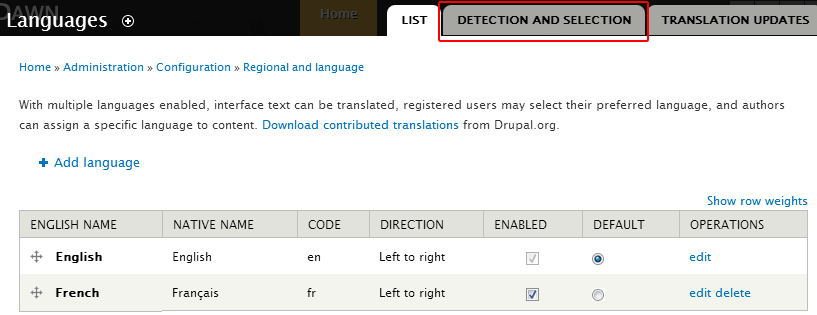
Enable the URL Detection Method and save your settings:

- You're now ready to start using multiple languages with Drupal. Languages can be switched by appending the language code (found at Configuration > Languages) to the end of your website's URL. For example:
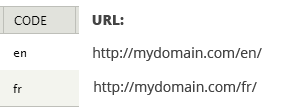
When http://www.mydomain.com/fr is accessed, Drupal is now in French:

Enabling Right to Left (RTL)
To change the text direction to right-to-left, follow these steps:
- Navigate to Configuration > Language in the Drupal administration UI. Find the language(s) you would like to convert to RTL and click "Edit".
- Change the Direction option to "Right to Left" and save your options:
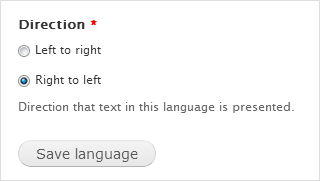
Notice: You will have to manually re-arrange Revolution Slider captions to suit your needs when RTL is enabled. All other areas of the ThemeTastic framework will automatically convert to RTL when the above steps are performed.
Further Information
The steps above install a basic multilingual configuration in Drupal. If needed, the Internationalization suite can be used to extend Drupal's multilingual capabilities even further. Download the Drupal 7 version and place the contents in the sites/all/modules folder to get started.
Another useful tool module to look into is the Translation Management Tool. This module features extensions for both Google and Bing translate. Creating a different node for each language can be time consuming, Google and/or Bing translate can be used to automate this process. The Translation Management Tool is recommended for developers who need a quick solution for translation of a large body of content.
II. Content Types / Templates
This section contains a list of the content types which come prepacked with the ThemeTastic theme. Content types are used to organize the nodes created on your Drupal website. Each content type has specific fields for certain pieces of data. These fields are described in greater detail for each content type below:
To create a new node under a content type, click the Add Content link in the Drupal administration toolbar at the top of the page. A list of each content type will be prompted -- choose a content type and create the new node.
Fields for each content type can be added, edited or deleted through the Drupal administration interface. Please refer to the documentation related to each individual content type for more details.
Basic Page
The following fields can be editted in the Drupal administration interface. Navigate to Structure > Content Types > Basic Page > Manage Fields to modify the basic page field settings.

Below is a list of each basic page field along with a description of it's respective purpose:
- Title: The node title. This value will be used as the page title sitewide.
- Body: The body field contains a node's content. Valid formats consist of Plain Text, Filtered Text, and HTML code.
Blog Post
The following fields can be editted in the Drupal administration interface. Navigate to Structure > Content Types > Blog Post > Manage Fields to modify the basic page field settings.
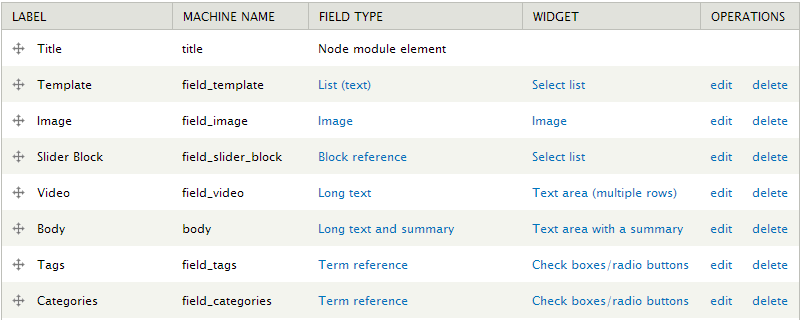
- Title: The node title. This value will be used as the page title sitewide.
- Template: What kind of post type is this blog post? The post type will determine which blog template is used. If no post type is selected, Drupal's default field settings will be used. For a demonstration of each blog template, please refer to the ThemeTastic theme demo.
- Image: Image(s) to be displayed with this blog post. This image will also be used for the thumbnail when the "Video" template is selected.
- Slider Block: If the Slider post type is selected, select a Revolution Slider block to embed in this post.
- Video: If the Video post type is selected, enter the embed code to a YouTube or Vimeo video.
- Body: The body field contains a node's content. Valid formats consist of Plain Text, Filtered Text, and HTML code.
- Tags: Add tags to a blog post. Tags can be added or removed from this field by navigating to Structure > Taxonomy.
- Categories: Blog post categories. This list can be modified or added to by navigating to Structure > Taxonomy.
Portfolio
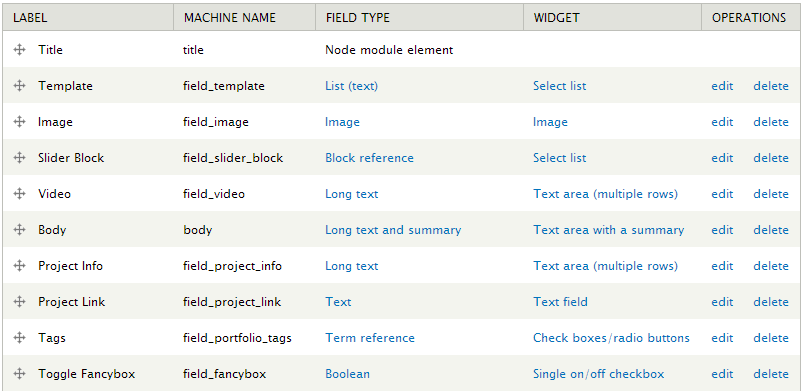
- Title: The node title. This value will be used as the page title sitewide.
- Template: What kind of post type is this portfolio? The post type will determine which portfolio template is used. If no post type is selected, Drupal's default field settings for this content type will be used. For a demonstration of each portfolio template, please refer to the ThemeTastic theme demo.
- Image: Image(s) to be displayed with this portfolio item. Multiple images can be integrated with a Slider or Lightbox based on the template selected.
- Slider Block: If the "Slider" template is in use, select a Revolution Slider block to embed into this portfolio page.
- Video: If the Video post type is selected, enter the URL to a YouTube or Vimeo video.
- Body: The body field contains a node's content. Valid formats consist of Plain Text, Filtered Text, and HTML code.
- Project Info: An optional table used to feature important data related to a particular project.
- Project Link: Add a link to the project. When this field has a value, a "Launch Project" button will be displayed next to the paginator on the portfolio post.
- Tags: Portfolio tags that will be used with the filter on portfolio views. This list can be modified or added to by navigating to Structure > Taxonomy.
- Toggle Fancybox: When checked, the portfolio item will feature a Lightbox option on all View blocks/pages.
Services
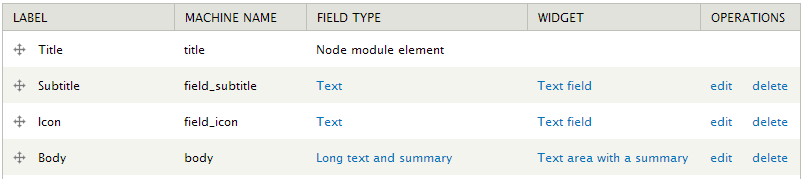
- Title: The node title. This value will be used as the page title sitewide.
- Subtitle: What kind of post type is this blog post? The post type will determine which blog template is used. If no post type is selected, Drupal's default field settings will be used. For a demonstration of each blog template, please refer to the ThemeTastic theme demo.
- Icon: Image(s) to be displayed with this blog post. This image will also be used for the thumbnail when the "Video" template is selected.
- Body: The body field contains a node's content. Valid formats consist of Plain Text, Filtered Text, and HTML code.
Contact Page

The contact page is generated by the Contact module. To change the e-mail address this page sends to, naviagate to Modules > Contact > Configure.
The map on the contact page can be modified through the ThemeTastic theme settings by navigating to Appearence > Settings > Contact Page. Here the latitude/longitude values for Google Maps, along with the introduction message on the contact page, can be configured.
Block: "How To Reach Us"
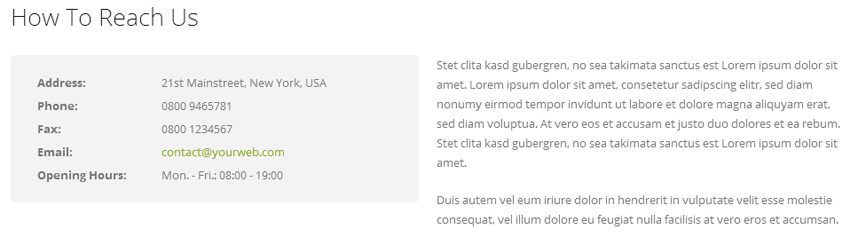
The contents "How to Reach Us" portion of the contact page is contained in a block, and can be edited by navigating to Structure > Blocks.
III. Drupal Configuration
Modules
ThemeTastic requires a few Drupal modules to function fully. To enable these modules, navigate to the Modules section in the Drupal UI (found at the top of the screen in the Drupal administration toolbar). Inside of the sites/all/modules folder of the download files you will find the following module folders and their contents:
- Required Modules:
- Block Reference: Used to embed slider blocks in node pages for the ThemeTastic blog, portfolio sections
- Context: Used to genereate templates based of contextual conditions (ie. Node type, paths, etc)
- Views Isotope: Integrates the popular isotope.js plugin with the Views module, used for portfolio views
- Views: Dependency for a majority of ThemeTastic functionality, Views Isotope and Revolution Slider modules.
- Optional Modules:
- Backup & Migrate: Used for the "new installation" option, demo content installation.
- Features: Used for the "existing installation" option.
- Entity: Required by Revolution Slider module.
- Revolution Slider: The Revolution Slider module adds functionality and a drag/drop interface for the popular Revolution Slider jQuery plugin.
- Replicate/Replicate UI: Used by Revolution Slider module for individual slide cloning.
- ThemeTastic: Features: Used in conjunction with the Features module on the "existing installation" option.
Menus
Drupal 7 menus can be configured through the administration interface at Structure > Menus. Utilize the "Drag/Drop" interface on this page to rearrange current menu items, or click the Add a link button to add a new menu item. Instructions for enabling dropdown menus can be found in the section below.
Dropdown Menus
To create or modify a dropdown menu, navigate to Structure > Menus > Main Menu > Edit Menu. The diagram below illustrates
an example of a dropdown menu:
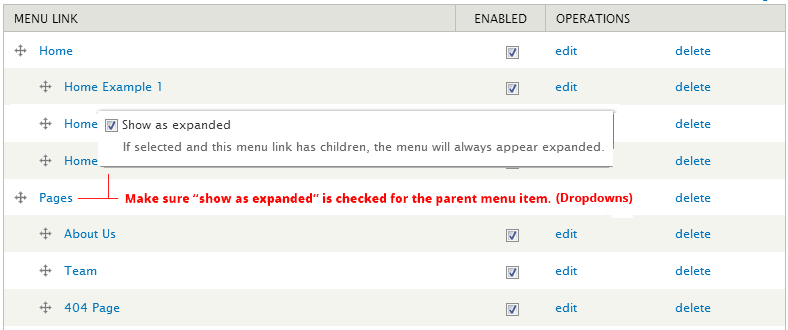
The diagram above illustrates a parent link (the Pages link) and several child links (indented items underneeth the Pages link).
Ensure that the parent item always has the show as expanded item checked to trigger a dropdown menu. Each child link, along with the parent item, must be checked as Enabled to be displayed in the menu.
Indenting any menu item will make the item a child link within the dropdown menu.
Contexts
The ThemeTastic theme utilizes the Context module to control the homepage content, blocks, menus, and global elements such as header or footer regions. If multiple color schemes or region templates are needed, the context module is also useful when combined with the Delta Module.
To add a new context or modify an existing context, navigate to Structure > Context and locate the appropriate option. The ThemeTastic: Features module (enabled during theme installation) includes seven prepackaged context definitions:
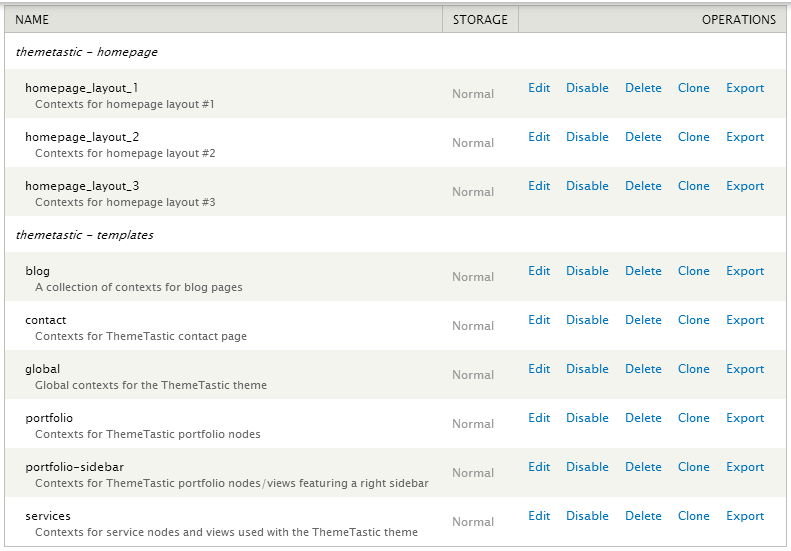
All block and menu trail configuration settings which came packaged in the ThemeTastic: Features module are contained in the context definitions above. Creating/modifying contexts is simple! Each context arguement is comprised of two parts: conditions and reactions.
Example: A block titled NEW_BLOCK has been created and needs to be placed in the second sidebar region on blog posts.
- Condition: Node Type = Blog Post
- Reaction: Blocks > Sidebar Second = NEW_BLOCK
The above arguement will result in NEW_BLOCK appearing in the second sidebar region on all pages of the blog post content type. Context conditions can be based on several options such content types, path, taxonomy terms, and user roles.
Although a multitude of reaction options also exist, ThemeTastic only uses the block and menu reactions in the preconfigured theme settings. Please modify the appropriate context definition if the need to disable the preconfigured block/menu settings arise.
Blocks / Regions
Blocks and Regions are two elements used do develop Drupal websites. Blocks (a block of content) are placed inside of regions to organize the content which appears inside of regions on your Drupal website. This section will document the following information:
- Regions: An example illustrating the layout for block regions available with the ThemeTastic theme.
- Blocks: Create a new block (HTML is allowed inside of blocks) and placing a block in a region.
Regions
The grid below demonstrates the region layout for the ThemeTastic theme. Each region is used as a container to hold blocks. CSS elements for each region can be added/modified through the Theme Settings at Appearence > Settings > Regions.
The diagram above can be used to help you determine where on the page you want to place blocks. Blocks can be created, and added to regions, by navigating to Structure > Blocks in the Drupal administration interface. The section below, titled Blocks, will describe creating new blocks and placing blocks within regions in greater detail.
Blocks
Creating a Block
Blocks can be added/modified by navigating to Structure > Blocks > Add Block in the Drupal administrative interface. Each block can hold plain text or full HTML markup and be used on multiple pages of your website.
Using a block is highly recommended when an element needs to be used on multiple pages. Make sure you check the filter settings if HTML is needed.
Editing a Block
Blocks can be edited by navigating to Structure > Blocks in the Drupal administration interface, or by hovering over a block on the page and clicking the Edit block link.
CSS classes can also be added to each block on the edit block page.
Placing Blocks in a Region
Blocks can be placed in regions by utilizing the "drag and drop" interface found at Structure > Blocks or on the block edit page:
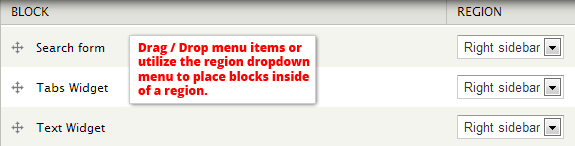
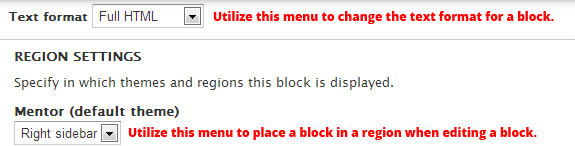
Each block can be edited by navigating to Structure > Blocks in the Drupal administration interface and clicking the "configure" link next to the block you wish to modify.
Limiting Blocks to Specific Pages
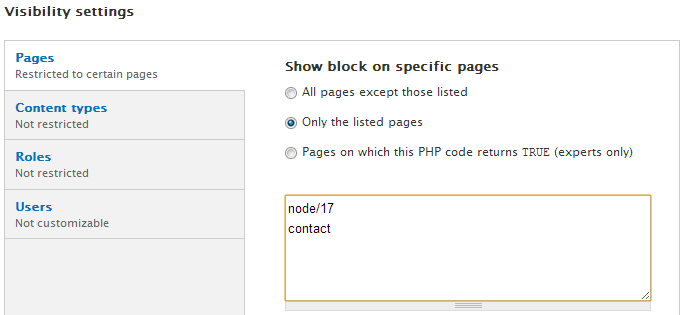
To place a block on a specific page, or multiple pages, navigate to Structure > Blocks in the Drupal administration interface and click the configure link next to the block you are editing.
Locate the Pages tab at the bottom of the page. Here you can specify the address to each page you wish to include or disclude each respective block on.
Example In the example on the left, the block will only be listed if the path is /contact or /node/17.
Note: If a more robust way to control blocks/regions is desired, use of the Context module is highly recommended.
Views
The Views Module is a popular Drupal module utilized extensively within the ThemeTastic theme framework to build blocks and pages based upon node and taxonomy content. Views is being integrated into Drupal core for Drupal 8, so if you've never used the module before now is a great time to learn. Both the ThemeTastic: Tools module and demo content file (enabled during theme installation) come packaged with the following views (found at Structure > Views):

Click the Edit button to modify each view individually. If you would like to control the placement of these blocks on pages, please refer to the Blocks/Regions section of this documentation.
Views is a complex module with an enormous amount of capabilities (which are far too broad to detail in this documentation file). If you are unsure of how to configure the Views module, please contact Theme Boutique support and we can help you solve your problem.
Reverting Views
If you're a more experienced Drupal user, there is nothing particularly important that needs to be known about the View pages/blocks which come with the ThemeTastic theme. Fields, field markup, and filters can be added or modified as needed. If the need to revert a view back to the default settings should ever arise, navigate to Structure > Views and locate the view in question. Open the dropdown menu for the view and click "Revert" (the ThemeTastic: Tools module must be enabled for this functionality).
Theme Settings
The theme settings form an integral part of the ThemeTastic framework. To access the theme settings, navigate to Appearence > Settings.
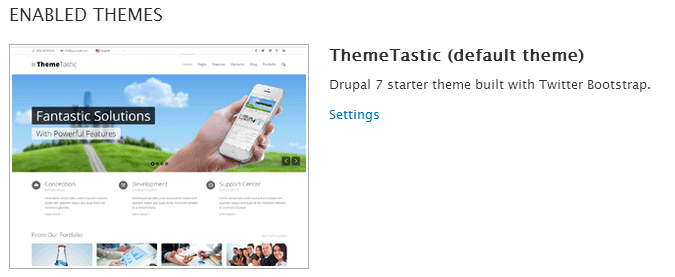
Here you will find a tabbed options panel with the following sections:
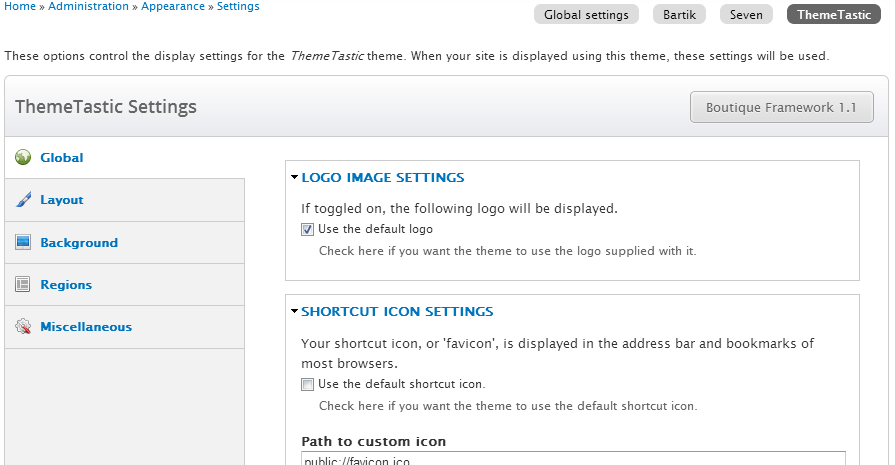
- Global: Default Drupal theme settings.
- Layout: Modify the layout width (full or boxed), enable/disable responsive layout, and set the color scheme.
- Background: Set the background color and background image. Contains an upload field for custom background images.
- Regions: Configure the Twitter Bootstrap grid settings for each region. An option to add additional CSS classes to each region can also be found.
- Misc: Set Google Maps coordinates for the contact page, enable/disable the "parallax" effect on the homepage slider, upload iOS icons.
If needed, more detailed descriptions for each individual setting can be found underneeth each option when using the theme options panel.
Revolution Slider
The Revolution Slider module links together three key components: the slide builder, the Blocks Module, and Revolution Slider javascript settings. This section of the documentation will detail the aforementioned components in greater detail so you can get started on creating your own slides as soon as possible!
Managing Sliders
Before we can start building slides, we will need to first create a slider to attach those slides to. Navigate to Structure > Revolution Slider to access the.
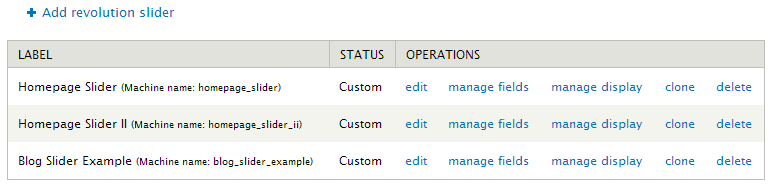
Consider this page the "landing page" for the Revolution Slider module. Here users can:
- Add a revolution slider: Creates a new Revolution slider block.
- Edit/Delete/Clone Sliders: To add a new slide to a slider, click the "edit link". Cloning a slider will clone all javascript settings, along with copies of each slide added to the slider being cloned.
Once a new slider has been created and at least one slide has been created on that slider, a block will automatically be generated. This block can then be used as any other Drupal block would be (applied to regions, integrated with the Context module, embedded in nodes, etc).
Slide Builder
Once a slider has been created, we can begin adding slides to that particular slider block. Navigate to Structure > Revolution Slider and "edit" the slider you would like to add a slide to. Click the Add new slide link to get started.
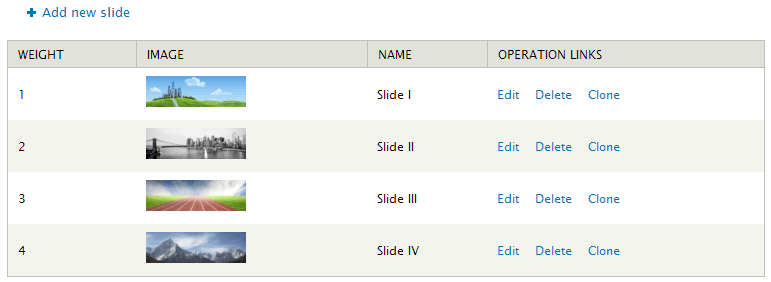
Next, click the Add new slide link to open up the slide builder:
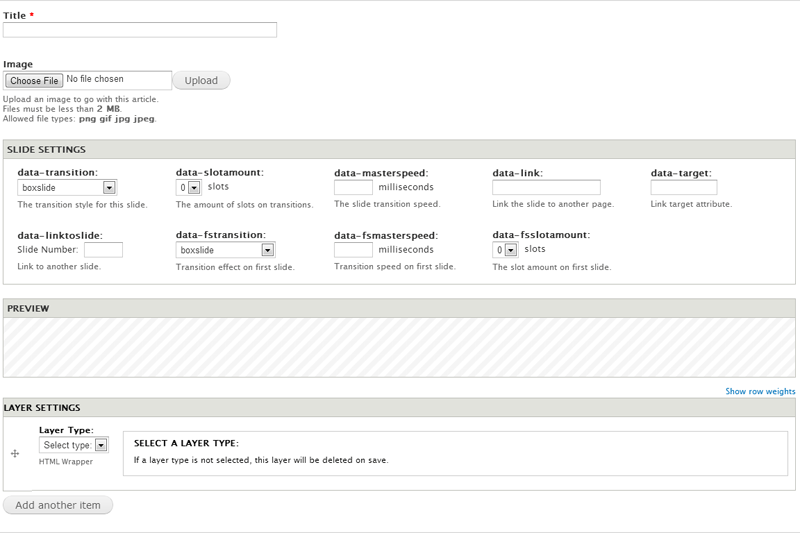
The slide builder consists of five sections:
- Title: The title of the slide. This is used for administrative purposes only.
- Image: The slide background image. Suggested image dimensions (in pixels) are 1920x460.
- Slide Settings: The settings for the slide.
- Preview: Drag and drop slide editor used in conjunction with the layer settings.
- Layer Settings: The settings for each layer.
Although descriptions for each field are provided in the slide builder itself, further documentation may be needed if you have never used the Revolution Slider in the past. Please refer to the Revolution Slider documentation (found in the assets folder of the ThemeTastic theme download from ThemeForest) for a comprehensive overview of the plugin's capabalities.
Notes:
- An image must first be uploaded to activate the Slide Builder preview.
- If the "layer type" option is set to "Select Layer Type...", the layer will be deleted on save. A "delete button" is being planned for future versions of the Revolution Slider module, in the meantime please use this method to delete unwanted layers.
Integrating CSS styles with the Revolution Slider
The Slide Builder module integrates with the css/slider.css file found in the ThemeTastic theme directory. When stying your slider elements, please make sure to use this file if you want to see your styles in the Slide Builder preview.
Slider Blocks
Once a slider has been created, and has at least 1 slide added to the slider, a block will be automatically generated:

These blocks can be placed in regions at Structure > Blocks, or by using the Context module. Slider blocks can also be embedded in portfolio/blog nodes by using the "Slider Block" field for those respective content types.
Customer Support
Support Policy
Having troubles? We're here to help! Theme support is handled through our dedicated support forum. If you are having an issue with a theme, please create an account on our support forums (you'll need access to your purchase code to create an account). Once your purchase has been verified, your forum account will be approved. Thanks!

Customization Requests
All theme modifications which alter or built upon the original theme functionality are considered extra customizations and are not covered by Theme Boutique's support policy. If you would like to request a quote for paid customizations, please contact us through our author profile page and we will respond to your query within 48 hours.